SAML: Integrate with Google G Suite
KACE Cloud subscribers can use Google G Suite when setting up single sign-on (SSO). Configuring SSO to use Google G Suite lets users sign in to KACE Cloud using their managed Google account credentials.
- Open both KACE Cloud and your Google Admin console.
- Sign in to your Google Admin console
using your administrator account.
- This account does not end in @gmail.com.
- You must sign in with a Google account that is a super administrator.
- In the Google Admin console:
- From the Admin console home page, go to Apps > SAML apps.
- Click Add + at bottom right of page.
- Click Set up my own custom app.
The Google IDP Information window will open and the SSO URL and Entity ID fields are automatically populated.
- Download the IDP Metadata file.
This information is required in KACE Cloud.
- Click Next.
- Set up KACE Cloud to use Google for single sign-on. In KACE Cloud, complete the following steps:
- Open a new incognito browser window and sign into to your KACE Cloud tenant admin portal https://{your site}.kacecloud.com.
The KACE Cloud account you are using must have the System Admin role.
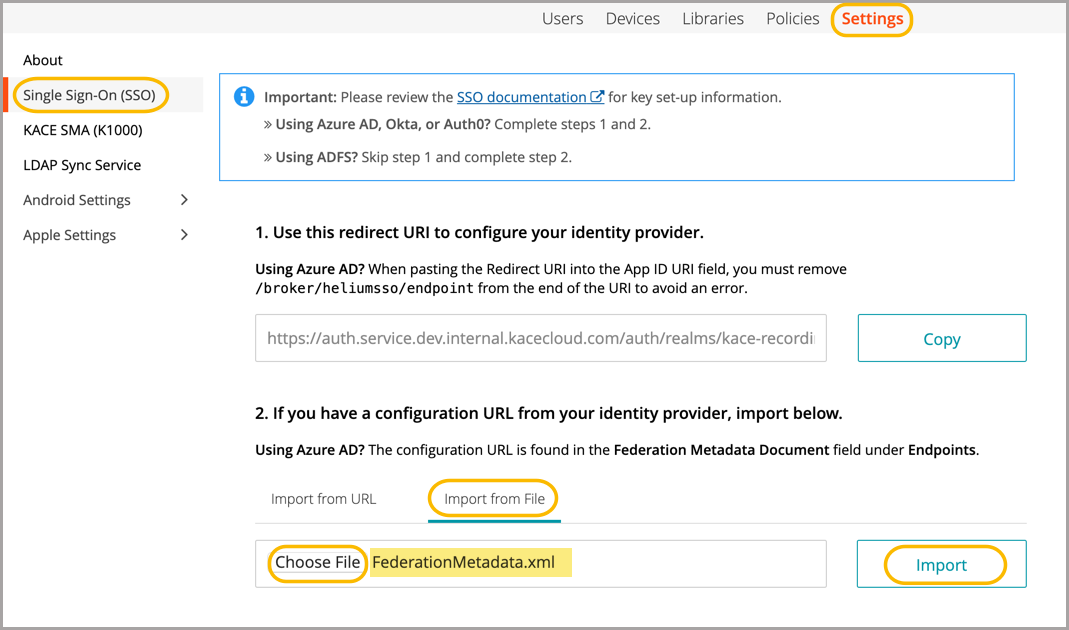
- Select the Settings tab in top navigation.
- In left navigation, under Integrations, choose Single Sign-On (SSO) .
- Click SAML v2.0.

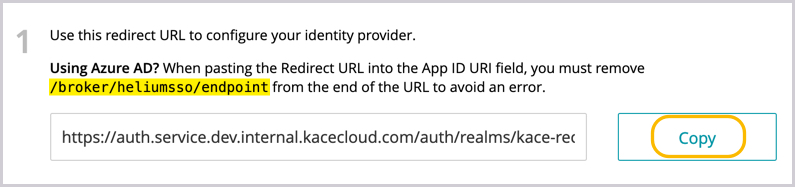
- In KACE Cloud, in the SSO Wizard, copy the redirect URL to configure the identity provider. Save this information for later use.
- Import the IDP metadata file from Google downloaded in step 3d:
- Select the Import from File tab.
- Click the Choose File button then locate the IDP metadata file downloaded from Google.
- Click Import.
- Open a new incognito browser window and sign into to your KACE Cloud tenant admin portal https://{your site}.kacecloud.com.
- In KACE Cloud, update the SAML settings.
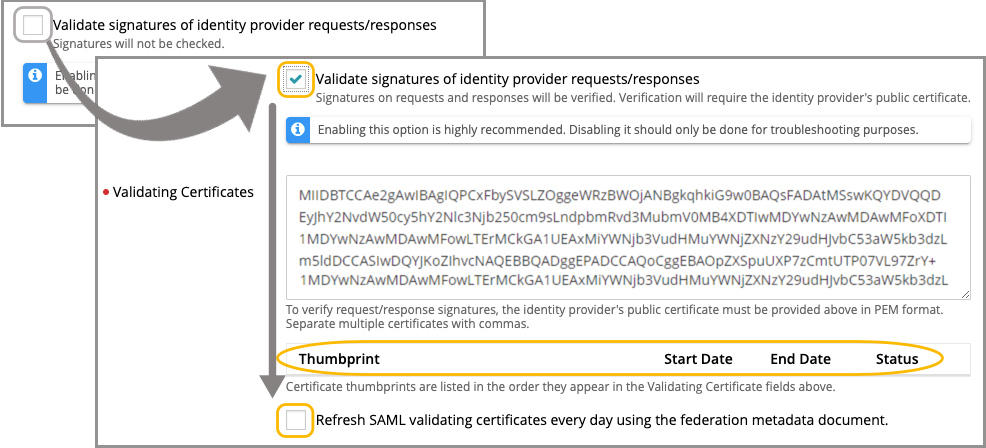
- Ensure the Validate signatures of identity provider requests/responses check box is selected, then review the contents ot Validating Certificates field.
It is highly recommended to leave the Validate signatures of identity provider requests/responses check box selected to ensure optimal security. Disable this check box only for troubleshooting purposes.
If the certificate value is obtained after importing the IDP Metadata file in step 4f, it appears in the Validating Certificates field. Otherwise, you must manually copy and paste the appropriate value.
- Click Save Settings at the bottom of page.
- Ensure the Validate signatures of identity provider requests/responses check box is selected, then review the contents ot Validating Certificates field.
- In KACE Cloud, confirm the user attribute mappings.
- In the SSO Wizard, in the User Attribute Mappings area, add the following mappings:
Attribute Name First Name: http://schemas.xmlsoap.org/ws/2005/05/identity/claims/givenname Last Name: http://schemas.xmlsoap.org/ws/2005/05/identity/claims/surname Primary Email: http://schemas.xmlsoap.org/ws/2005/05/identity/claims/upn - Click Save Settings at the bottom of page.
- In the SSO Wizard, in the User Attribute Mappings area, add the following mappings:
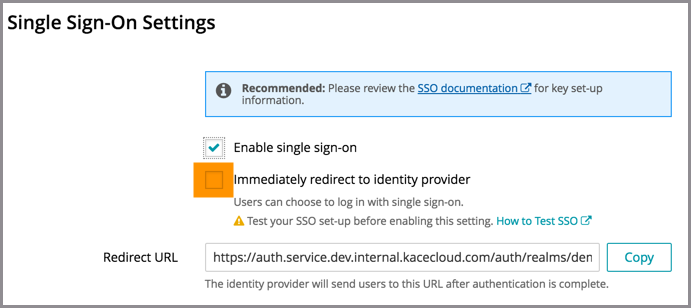
- In KACE Cloud, enable and test single sign-on.
- On the Single Sign-On Settings page, at the very top, select the Enable single sign-on (SSO) check box.
- Before selecting the Immediately redirect to identity provider check box, test the success of the single sign-on setup.
- Open a new incognito window or private browser to ensure login data is clear.
- Go to the KACE Cloud portal, but do not log in.
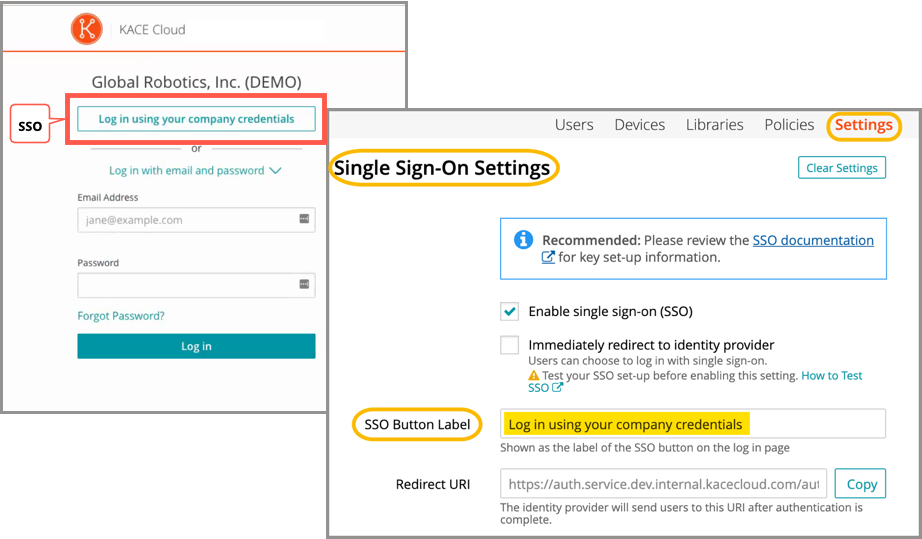
- Follow the Single Sign-On workflow using the customizable button.
In the example below, the Log in using your company credential button leads to the SSO workflow. The label on this button can be customized using the SSO Button Label field at the top of the SSO Wizard.
- On the login page that appears, log in using your identity provider credentials.
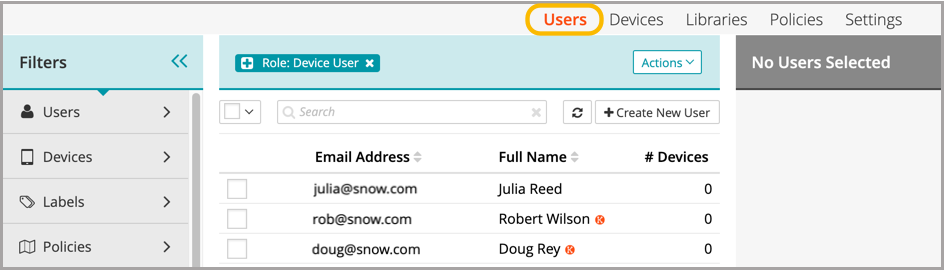
Single sign-on is successfully set up if the Users landing page appears in KACE Cloud:
When the setup of single sign-on is successfully tested, users can be redirected to the identity provider's login screen.
- In the Google Admin console, configure and Enable the Google Custom SAML app in the Google Admin console.
- In the Google Admin console, add an application name and description.
Optional. Upload a PNG or GIF file to serve as an icon for your custom app. The icon image should be 256 square pixels.
- Click Next.
- In the Service Provider Details window, enter an ACS URL, Entity ID, and Start URL (if needed) for your KACE Cloud tenant as follows:
- Click Next.
- On the Attribute Mapping page:
- Set the Select category and Select user field values as follows for the listed attributes:
Application attribute Select category Select user field http://schemas.xmlsoap.org/ws/2005/05/identity/claims/givenname Basic Information First Name http://schemas.xmlsoap.org/ws/2005/05/identity/claims/surname Basic Information Last Name http://schemas.xmlsoap.org/ws/2005/05/identity/claims/upn Basic Information Primary Email - Click Finish.
- Set the Select category and Select user field values as follows for the listed attributes:
- On the app dashboard:
- Select the app that you just created, then click Edit Service.
- To turn on or off a service for everyone in your organization:
- Click On for everyone or Off for everyone.
- Click Save.
- To turn on or off a service only for users in an organizational unit:
- On the left, select the organizational unit.
- Select On or Off.
- If the organization's status is already overridden, choose an option:
- Inherit: Reverts to the same setting as its parent.
- Save: Saves your new setting (even if the parent setting changes).
- Use access groups to turn on a service for specific users within or across your organizational units.
- To turn on or off a service for everyone in your organization:
- Click Finish.
- Select the app that you just created, then click Edit Service.
- In the Google Admin console, add an application name and description.
- Verify that SSO is working.
- Close all browser windows.
- Open your KACE Cloud tenant admin portal at https://[your_tenant].kacecloud.com, then click the Single Sign-On button.
If the SSO configuration is successful, you are automatically redirected to the Google sign-in page.
- Enter your credentials.
- After your credentials are authenticated, you are automatically redirected back to KACE Cloud.
When the setup of single sign-on is successfully tested, users can be redirected to the identity provider's login screen.
Troubleshooting
| Problem | Solution |
|---|---|
| Single Sign-On button not visible on KACE Cloud portal. | Confirm that Enable single sign-on is checked on the SSO Settings page. |
| Error message on KACE Cloud portal. |
The identity provider successfully validated the username and password, but KACE Cloud did not accept the user. This may be because the user is not in the Azure AD group being assigned a device admin role. To troubleshoot:
|
| Single Sign-On misconfiguration or identity provider error |
As part of SSO, most companies will redirect their users to their identity provider's sign-in page. In the case of a misconfiguration or identity provider error, a device admin can bypass SSO by adding ?nosso=1 to the end of their product portal URL to turn off redirection and go directly to the KACE Cloud login screen. Example: https://yourcompany.kacecloud.com?nosso=1 |
| An "invalidFederatedIdentityActionMessage" error message is displayed on KACE Cloud portal. | The identity provider used a certificate to sign the SAML request/responses which does not match one of the certificates listed in the "Validating certificates" field of the KACE Cloud single sign-on configuration. Ensure that the list of Validating Certificates matches the list of certificates currently being used by your identity provider. Enable the Refresh SAML validating certificates every day using the federation metadata document field to have KACE Cloud automatically keep the Validating Certificates field up to date by attempting to retrieve the most current signing certificate information from the URL provided in the Federation metadata document URL field each day. |